CentOS7通过Yum库安装的Nginx使其支持TLS1
如果TLSv1.3如期发布,OpenSSL 1.1.1 将于2018年4月17日面向公众发布。对于服务器来说,我还是喜欢CentOS,支持周期很长,折腾一次可以用很长世间,因此以下记录一下在基于LNMP的CentOS 7 系统上启用TLSv1.3的过程。
1 升级系统
1 | yum update |
升级后的系统版本为:
1 | cat /etc/centos-release |
2 安装官方稳定版的 nginx
1 | 通过官方源安装nginx的目的是: |
配置源:
1 | rpm -ivh http://nginx.org/packages/centos/7/noarch/RPMS/nginx-release-centos-7-0.el7.ngx.noarch.rpm |
安装 nginx:
1 | yum install nginx -y |
查看 nginx 版本:
1 | nginx -v |
获取编译参数:
1 | # nginx -V |
3 编译 nginx
安装可能用到的依赖:
1 | yum install -y git gcc gcc-c clang automake make autoconf libtool zlib-devel libatomic_ops-devel pcre-devel openssl-devel libxml2-devel libxslt-devel gd-devel GeoIP-devel gperftools-devel perl-devel perl-ExtUtils-Embed |
获取 nginx 源码:
1 | wget http://nginx.org/download/nginx-1.16.1.tar.gz |
获取 openssl 源码
1 | cd nginx-1.16.1 |
为了启用 Certificate Transparency 和 TLSv1.3,需要额外加入如下编译参数:
1 | --with-openssl=../openssl/ |
加在官方编译参数后面,简单修改形成完整的编译参数:
1 | ./configure --prefix=/usr/share/nginx --sbin-path=/usr/sbin/nginx --modules-path=/usr/lib64/nginx/modules --conf-path=/etc/nginx/nginx.conf --error-log-path=/var/log/nginx/error.log --http-log-path=/var/log/nginx/access.log --http-client-body-temp-path=/var/lib/nginx/tmp/client_body --http-proxy-temp-path=/var/lib/nginx/tmp/proxy --http-fastcgi-temp-path=/var/lib/nginx/tmp/fastcgi --http-uwsgi-temp-path=/var/lib/nginx/tmp/uwsgi --http-scgi-temp-path=/var/lib/nginx/tmp/scgi --pid-path=/run/nginx.pid --lock-path=/run/lock/subsys/nginx --user=nginx --group=nginx --with-file-aio --with-ipv6 --with-http_ssl_module --with-http_v2_module --with-http_realip_module --with-stream_ssl_preread_module --with-http_addition_module --with-http_xslt_module=dynamic --with-http_image_filter_module=dynamic --with-http_sub_module --with-http_dav_module --with-http_flv_module --with-http_mp4_module --with-http_gunzip_module --with-http_gzip_static_module --with-http_random_index_module --with-http_secure_link_module --with-http_degradation_module --with-http_slice_module --with-http_stub_status_module --with-http_perl_module=dynamic --with-http_auth_request_module --with-mail=dynamic --with-mail_ssl_module --with-pcre --with-pcre-jit --with-stream=dynamic --with-stream_ssl_module --with-google_perftools_module --with-debug --with-cc-opt='-O2 -g -pipe -Wall -Wp,-D_FORTIFY_SOURCE=2 -fexceptions -fstack-protector-strong --param=ssp-buffer-size=4 -grecord-gcc-switches -specs=/usr/lib/rpm/redhat/redhat-hardened-cc1 -m64 -mtune=generic' --with-ld-opt='-Wl,-z,relro -specs=/usr/lib/rpm/redhat/redhat-hardened-ld -Wl,-E' --with-openssl=openssl-1.1.1d |
进入 nginx 源码目录,并输入如上完整的编译参数。
开始编译:
1 | make |
查看编译好的 nginx 信息:
1 | ./objs/nginx -v |
备份已经安装好的官方 mainline 版,安装编译版:
1 | mv /usr/sbin/nginx /usr/sbin/nginx.1.16.1_no_tls1.3 |
4 修改 nginx 配置文件,默认启用 TLSv1.3 的前三项常用的加密算法
1 | ... |
重启 nginx 服务以使修改生效:
1 | systemctl restart nginx |
5 测试 TLSv1.3 是否生效
5.1 使用 testssl 工具
1 | git clone --depth 1 https://github.com/drwetter/testssl.sh.git |
命令为(coldawn.com 需要换成自己的域名):
1 | ./testssl.sh -p coldawn.com ... Testing protocols via sockets except SPDY+HTTP2 SSLv2 not offered (OK) SSLv3 not offered (OK) TLS 1 offered TLS 1.1 offered TLS 1.2 offered (OK) TLS 1.3 offered (OK): draft 28, draft 27, draft 26 NPN/SPDY h2, http/1.1 (advertised) ALPN/HTTP2 h2, http/1.1 (offered) ... |
详细的情况,用大写的 P 作为参数:
1 | ./testssl.sh -P coldawn.com |
5.2 使用现代浏览器
Chrome canary 69.0.3484.0 和 Firefox Nightly 63.0a1 已经支持 tls1.3 Draft 28。
验证
使用 SSLlabs 验证是否启用 TLS1.3
这是本站的检测结果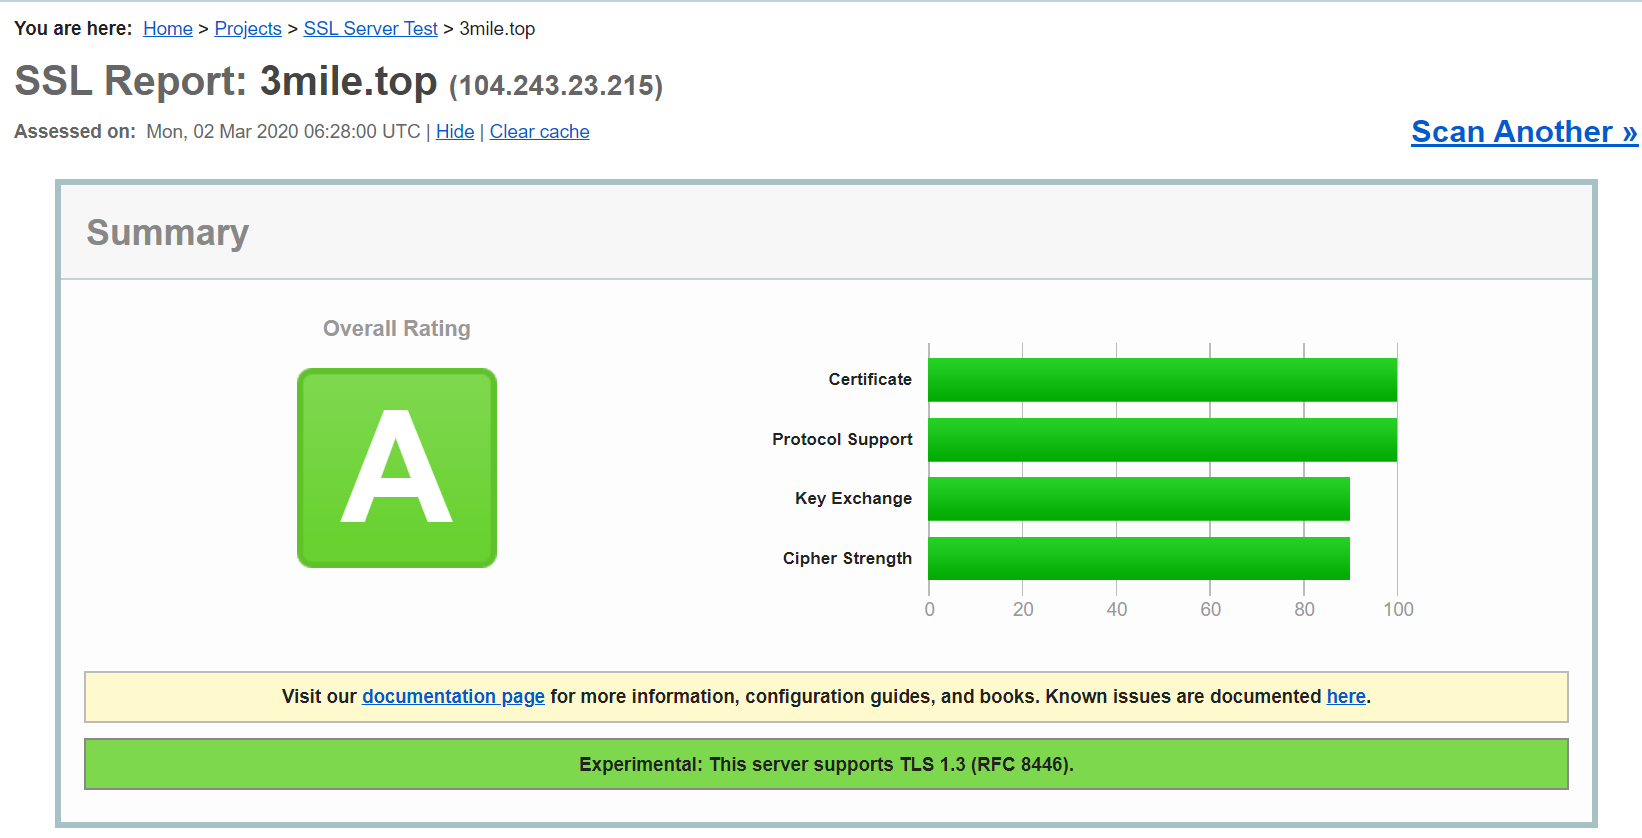
本博客所有文章除特别声明外,均采用 CC BY-NC-SA 4.0 许可协议。转载请注明来自 3mile的博客!
评论